Kubernetes Namespaces
A practical guide to what namespaces are, how they work, and how to use them to keep clusters organized, secure, and manageable as they grow.
Namespace
A Kubernetes cluster is a shared pool of compute resources. By default, every workload you deploy — pods, services, secrets, config maps — lands in the same flat space with no logical separation. That works fine for a single application. Once you have multiple apps, teams, or environments on the same cluster, the lack of structure becomes a real operational problem.
Namespaces are Kubernetes' built-in solution. They divide one physical cluster into multiple isolated virtual environments, each with its own resource scope, access controls, and naming context.
Think of it like this: A namespace is like a floor in an office building. Each team works on their own floor — they have their own desks (Pods), their own supplies (Secrets, ConfigMaps), and their own rules (RBAC). The building is the same cluster, but no one is stepping on each other's work.
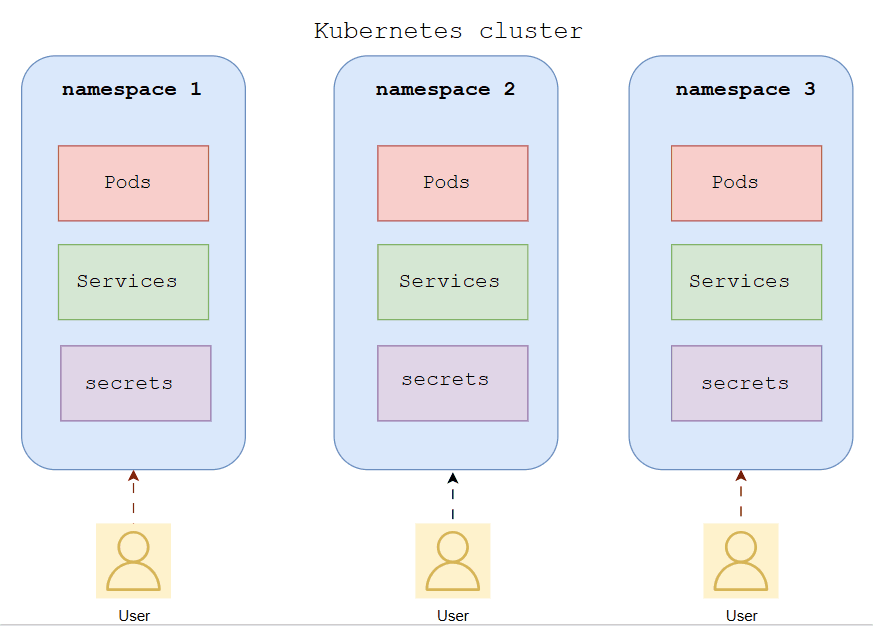 Namespaces — One Cluster, Multiple Isolated Environments
Every namespace gives you three things at once. Kubernetes uses these to keep workloads clean and controlled across a shared cluster.
| What It Does | How It Works |
|---|---|
| Name scoping | Resources in different namespaces can share the same name without conflict |
| Access control | RBAC Roles and RoleBindings are applied per namespace |
| Resource limits | ResourceQuotas cap CPU, memory, and object counts per namespace |
You create a namespace, deploy your workloads into it, and Kubernetes enforces the boundaries — on every API request.
The 4 Default Namespaces — Explained Simply
default
The catch-all. If you don't specify a namespace in your manifest, resources land here. Fine for quick tests — but don't run real workloads in it. Everything piles up with no separation, no quota, and no access control.
kube-system
This is where Kubernetes runs itself — the scheduler, controller manager, CoreDNS. Never deploy your own workloads here. Mixing application pods with control plane components is a fast way to break your cluster.
kube-public
Publicly readable by all users. Used for cluster bootstrapping data. You'll rarely touch this.
kube-node-lease
Holds heartbeat lease objects that nodes send to the control plane. Managed entirely by Kubernetes — leave it alone.
| Namespace | Purpose | Use it? |
|---|---|---|
default | Catch-all when no namespace is specified | Only for quick tests |
kube-system | Core Kubernetes control plane components | No. Never. |
kube-public | Cluster bootstrapping data, publicly readable | Rarely |
kube-node-lease | Node heartbeat leases | No. Managed by Kubernetes. |
Key insight: The moment you have more than one workload or one team on a cluster, stop using
default. Create a namespace. It takes 30 seconds and saves hours of untangling later.
How It All Works — Step by Step
Here's what actually happens when you set up and use a namespace:
Namespace Setup Flow
1 — You create a namespace
Either imperatively with kubectl create namespace staging, or declaratively with a YAML manifest. For anything real, use the manifest — it's reproducible and version-controllable.
apiVersion: v1
kind: Namespace
metadata:
  name: staging
  labels:
    env: staging
    team: platform
2 — You deploy workloads into it
Target the namespace with -n in kubectl commands, or set namespace: in your manifest's metadata block.
kubectl apply -f deployment.yaml -n staging
kubectl get pods -n staging
kubectl get pods --all-namespaces
3 — You lock it down with RBAC
Create a Role scoped to the namespace, then a RoleBinding to assign it. A developer can have full access to staging and zero access to production — same cluster, clean boundary.
apiVersion: rbac.authorization.k8s.io/v1
kind: Role
metadata:
  name: developer
  namespace: staging
rules:
  - apiGroups: [""]
    resources: ["pods", "services", "configmaps"]
    verbs: ["get", "list", "create", "update", "delete"]
4 — You add a ResourceQuota
Cap the namespace so a runaway workload can't starve the rest of the cluster. New pods that would exceed the quota are rejected at the API level before they ever schedule.
apiVersion: v1
kind: ResourceQuota
metadata:
  name: staging-quota
  namespace: staging
spec:
  hard:
    requests.cpu: "4"
    requests.memory: 8Gi
    limits.cpu: "8"
    limits.memory: 16Gi
    pods: "20"
5 — Kubernetes enforces everything automatically
Every API request is checked against the namespace boundary, RBAC rules, and quota limits. You describe the structure — Kubernetes enforces it on every operation.
Key insight: Kubernetes works on desired state vs actual state. You define the namespace structure once. Kubernetes enforces it continuously — on every deploy, every scale event, every API call.
What Namespaces Do NOT Do
This is the part that causes real production incidents.
Namespaces provide logical and API-level isolation. They do not restrict network traffic between pods. By default, a pod in staging can talk directly to a pod in production using its full DNS name: service-name.production.svc.cluster.local. The namespace boundary is invisible to the network layer.
To enforce actual network isolation, you need NetworkPolicies — a separate resource that controls which pods and namespaces can communicate. Without one, traffic flows freely across all namespace boundaries.
Also worth knowing: some Kubernetes resources are cluster-scoped and exist completely outside any namespace — Nodes, PersistentVolumes, StorageClasses, ClusterRoles. Adding a namespace: field to a PersistentVolume manifest won't cause an error. Kubernetes will silently ignore it.
# See every resource type that lives outside namespace scope
kubectl api-resources --namespaced=false
Quick Reference — Naming Conventions
Kubernetes has no rename operation. Changing a namespace name means deleting it and recreating everything inside. Pick a convention before you have more than a few namespaces.
| Pattern | Example | Suitable for |
|---|---|---|
| By environment | production, staging, dev | Small teams, single application |
| By team | team-payments, team-auth | Multiple teams, shared cluster |
| By team + environment | payments-prod, payments-staging | Multi-team with strict environment isolation |
| By service role | monitoring, logging, ingress | Shared infrastructure components |
The team-and-environment pattern scales best. It keeps ownership clear, isolates environments fully, and allows per-team quotas and RBAC without namespace collisions.
Wrapping Up
Namespaces divide a single Kubernetes cluster into isolated virtual environments. They scope resource names, RBAC permissions, and ResourceQuotas. They do not isolate network traffic — that requires NetworkPolicies configured separately.
You describe the structure you want. Kubernetes enforces the name boundaries, access rules, and resource ceilings — on every API request. Understanding namespaces tells you exactly how to organize a cluster before it becomes a mess.
Once you're comfortable with namespaces, everything else in multi-team Kubernetes clicks faster — NetworkPolicies, LimitRanges, service accounts, multi-environment CI/CD — they all tie back to this same structure.
Try it yourself: Spin up a local cluster with minikube and watch namespace isolation in action:
kubectl create namespace team-a
kubectl create namespace team-b
kubectl run nginx --image=nginx -n team-a
kubectl get pods --all-namespaces
You'll see
team-ahas a running pod andteam-bis empty — same cluster, completely separate scopes.