Provisioning a Linux VM on Azure with Terraform
A hands-on walkthrough of provisioning a production-ready Azure Linux VM using Terraform — covering every component from networking to SSH authentication and remote state management.
Terraform Azure Linux VM
This project uses Terraform to provision a Linux Virtual Machine on Microsoft Azure — entirely through code. Instead of manually clicking through the Azure Portal to create a network, an IP address, and a VM, you write .tf files that describe what you want, and Terraform builds it automatically.
The goal is simple: describe infrastructure as code, run one command, get a running VM.
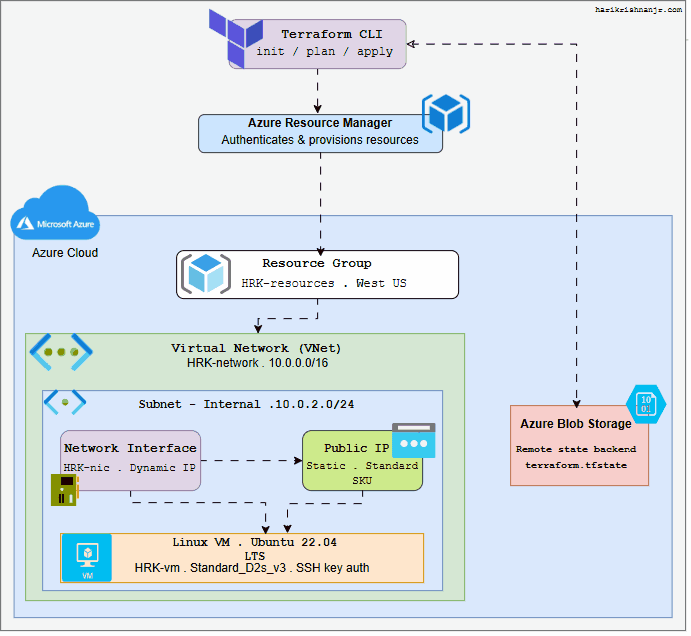
Architecture Overview
 Full provisioning flow — from Terraform CLI to a running Azure Linux VM
The Big Picture — How Everything Connects
There are two worlds in this diagram:
- Outside Azure — where Terraform runs on your local machine
- Inside Azure — where your actual infrastructure lives
And one bridge between them: Azure Resource Manager.
Your Machine                    Microsoft Azure
─────────────────               ──────────────────────────────────
Terraform CLI        ──────►    Azure Resource Manager
  init/plan/apply               (authenticates + provisions)
                                        │
                                        ▼
                                  Resource Group
                                        │
                                   Virtual Network
                                        │
                                      Subnet
                                     ┌──┴──┐
                                  Public IP  NIC
                                        └──┬──┘
                                         Linux VM
There is also a feedback loop — Azure Blob Storage stores the Terraform state file and feeds it back to the Terraform CLI on every run so it knows what already exists.
Every Component Explained
Terraform CLI — init / plan / apply
This is the tool running on your local machine. It is the starting point of everything. Three commands drive the entire lifecycle:
| Command | What it does |
|---|---|
terraform init | Downloads the Azure provider plugin, connects to the remote state backend |
terraform plan | Reads current state, calls Azure API read-only, shows exactly what will change |
terraform apply | Executes the plan — creates, modifies, or destroys real Azure resources |
Nothing in Azure is touched until you run apply and confirm. Terraform is declarative — you describe the desired end state, not a sequence of steps.
Azure Resource Manager (ARM)
ARM is Microsoft Azure's central control plane. Every single Azure resource — whether created via Portal, CLI, SDK, or Terraform — goes through ARM.
When Terraform runs apply, it does not directly create a VM or a network. It sends API calls to ARM, which then authenticates the request and provisions the resources on your behalf.
ARM is responsible for:
- Verifying your identity and subscription
- Enforcing Azure policies and quotas
- Routing creation requests to the correct Azure service
- Returning resource IDs back to Terraform for the state file
Think of ARM as the gatekeeper and orchestrator of everything inside Azure.
Resource Group — HRK-resources · West US
A Resource Group is Azure's logical container for related resources. Every Azure resource must belong to exactly one Resource Group.
In this project, the Resource Group does three important things:
Scopes the region — West US is defined once on the Resource Group, and every resource inside inherits it. You never repeat the location.
Defines the lifecycle boundary — deleting the Resource Group deletes everything inside it cleanly in one operation. This is how terraform destroy wipes the entire stack.
Organises billing and access — you can assign cost tracking, permissions, and monitoring policies at the Resource Group level, which automatically apply to everything inside.
It is the first resource Terraform creates, because everything else depends on it.
Virtual Network — HRK-network · 10.0.0.0/16
The VNet is Azure's equivalent of a private data centre network. It is a completely isolated network that only your resources can see — nothing from the public internet can reach inside it by default.
The address space 10.0.0.0/16 defines the total pool of private IP addresses available inside this network — 65,536 addresses. This is a standard RFC 1918 private range.
The VNet is the foundation layer for all networking in this project. The subnet, NIC, and VM are all built on top of it.
Subnet — Internal · 10.0.2.0/24
A subnet is a logical subdivision carved out of the VNet. While the VNet defines the entire address space, the subnet is the actual segment where resources get placed.
10.0.2.0/24 gives 256 addresses within the parent VNet's space. Network Interfaces are always attached to a subnet — not directly to the VNet.
Why subnets matter beyond just dividing IPs:
- Each subnet can have its own Network Security Group (firewall rules)
- Each subnet can have its own route table (traffic control)
- You can isolate different tiers — web, app, database — into separate subnets with different access rules
Public IP — Static · Standard SKU
The Public IP is an independent Azure resource that gives the VM a reachable address on the public internet. It is not part of the NIC or the VM — it exists on its own and gets associated to the NIC.
Static allocation — the IP address is assigned permanently and does not change across VM reboots or redeployments. A dynamic IP would change every time the VM is deallocated, breaking SSH configs and any DNS records pointing at it.
Standard SKU — the modern tier for Public IPs. It is secure by default — all inbound traffic is blocked unless you explicitly allow it through an NSG. It is also required for availability zones and Standard Load Balancers. The older Basic SKU is deprecated.
Network Interface — HRK-nic · Dynamic private IP
The NIC is the virtual network adapter that attaches to the VM. Every VM must have at least one NIC, and the NIC is what actually connects the VM to the network.
The NIC acts as the binding point for three things:
Subnet    ──┐
             ├──►  NIC  ──►  VM
Public IP  ──┘
- Subnet — determines which network segment the VM lives in
- Private IP — allocated dynamically from the subnet pool, stays stable for the lifetime of the NIC
- Public IP — associated here, giving the VM internet reachability
The NIC is created after both the Subnet and the Public IP exist, because it references both.
Linux VM — Ubuntu 22.04 LTS · Standard_D2s_v3 · SSH key auth
The VM is the final resource in the dependency chain — it can only be created after the NIC exists. It is the actual compute instance running your workload.
Standard_D2s_v3 — 2 vCPUs, 8 GB RAM. The D series is Azure's general-purpose tier. The s means premium storage support. This size is the standard starting point for dev and staging workloads.
Ubuntu 22.04 LTS — the operating system image published by Canonical. LTS means Long Term Support with security patches until 2027. It is identified in Terraform by four fields: publisher, offer, SKU, and version — the coordinates of Azure's image marketplace.
SSH key authentication — the VM is provisioned with your public key baked in. No password is set. To connect you use your private key from your local machine:
ssh -i ~/.ssh/id_rsa testadmin@<public-ip>
This is the correct security posture — passwords on cloud VMs are a common attack vector.
Azure Blob Storage — Remote State · terraform.tfstate
 terraform.tfstate stored in the backend container inside Azure Blob Storage
This sits outside the main provisioning chain but is arguably the most important operational component.
Terraform's state file (terraform.tfstate) is its memory — a JSON record of every resource it has created, mapping your .tf code to real Azure resource IDs. Without it, Terraform has no idea what exists in Azure.
By storing it in Azure Blob Storage:
| Problem with local state | How Blob Storage solves it |
|---|---|
| State lives on one person's laptop | Anyone on the team can run plan or apply |
Two people running apply simultaneously corrupts state | Blob leases act as a lock — only one apply runs at a time |
| Accidental deletion loses all state | Blob versioning lets you recover previous state snapshots |
| State contains sensitive resource IDs | Blob Storage encryption protects it at rest |
The dashed arrow from Blob Storage back to Terraform CLI in the diagram represents this feedback — on every plan or apply, Terraform first reads the current state from Blob Storage to know what already exists before deciding what to do next.
The Dependency Chain — Why Order Matters
Terraform doesn't create resources randomly. It reads the references between them and builds a dependency graph:
Resource Group
    │
    ├──► Virtual Network
    │         │
    │         └──► Subnet ──────────────────┐
    │                                       │
    └──► Public IP ─────────────────────────┤
                                            │
                                    Network Interface
                                            │
                                        Linux VM
Resources with no dependency on each other — like Subnet and Public IP — are created in parallel, which is why Terraform is faster than a sequential script. Resources that depend on others wait until their dependencies are ready.
This graph also determines destroy order — Terraform tears down in reverse, deleting the VM before the NIC, the NIC before the subnet, and so on.
Component Summary
| Component | Role |
|---|---|
| Terraform CLI | Translates your code into Azure API calls |
| Azure Resource Manager | Authenticates and executes every provisioning request |
| Resource Group | Logical boundary that contains and scopes all resources |
| Virtual Network | Isolated private network — the foundation of all connectivity |
| Subnet | The segment within the VNet where the VM actually lives |
| Public IP | Fixed internet-facing address, independent of the VM |
| Network Interface | Binds subnet + public IP together and attaches to the VM |
| Linux VM | The compute instance — the end goal of the entire chain |
| Azure Blob Storage | Stores Terraform state so the team shares one source of truth |
Implementation
Provider and Backend Configuration
terraform {
  required_providers {
    azurerm = {
      source  = "hashicorp/azurerm"
      version = "=4.1.0"
    }
  }
}

provider "azurerm" {
  features {}
  subscription_id = "YOUR-SUBSCRIPTION-ID"
}
Why pin the provider version? The version = "=4.1.0" constraint locks the AzureRM provider to an exact release. Without this, a future terraform init could pull a newer major version with breaking changes and silently break your configuration.
Why features {}? The block is required by the AzureRM provider even when empty. It controls optional soft-delete and purge behaviours for services like Key Vault. Leaving it empty uses the provider defaults.
backend.tf — Remote State Configuration
terraform {
  backend "azurerm" {
    storage_account_name = "azurebackendstoragehari"
    container_name       = "backend"
    key                  = "terraform.tfstate"
    # access_key is read from ARM_ACCESS_KEY env variable — never hardcode it
  }
}
Security: Never paste the access key directly into
backend.tf. Set it as an environment variable instead:export ARM_ACCESS_KEY="$(az storage account keys list \ --account-name azurebackendstoragehari \ --query '[0].value' -o tsv)"
variables.tf
variable "prefix" {
  description = "Prefix applied to all resource names"
  default     = "HRK"
}

variable "ssh_public_key_path" {
  description = "Path to your local SSH public key"
  default     = "~/.ssh/id_rsa.pub"
}
main.tf — All Resources
# Resource Group
resource "azurerm_resource_group" "example" {
  name     = "${var.prefix}-resources"
  location = "West US"
}

# Virtual Network
resource "azurerm_virtual_network" "main" {
  name                = "${var.prefix}-network"
  address_space       = ["10.0.0.0/16"]
  location            = azurerm_resource_group.example.location
  resource_group_name = azurerm_resource_group.example.name
}

# Subnet
resource "azurerm_subnet" "internal" {
  name                 = "internal"
  resource_group_name  = azurerm_resource_group.example.name
  virtual_network_name = azurerm_virtual_network.main.name
  address_prefixes     = ["10.0.2.0/24"]
}

# Public IP
resource "azurerm_public_ip" "main" {
  name                = "${var.prefix}-public-ip"
  location            = azurerm_resource_group.example.location
  resource_group_name = azurerm_resource_group.example.name
  allocation_method   = "Static"
  sku                 = "Standard"
}

# Network Interface
resource "azurerm_network_interface" "main" {
  name                = "${var.prefix}-nic"
  location            = azurerm_resource_group.example.location
  resource_group_name = azurerm_resource_group.example.name

  ip_configuration {
    name                          = "internal"
    subnet_id                     = azurerm_subnet.internal.id
    private_ip_address_allocation = "Dynamic"
    public_ip_address_id          = azurerm_public_ip.main.id
  }
}

# Linux Virtual Machine
resource "azurerm_linux_virtual_machine" "main" {
  name                = "${var.prefix}-vm"
  location            = azurerm_resource_group.example.location
  resource_group_name = azurerm_resource_group.example.name
  size                = "Standard_D2s_v3"
  admin_username      = "testadmin"

  network_interface_ids = [
    azurerm_network_interface.main.id
  ]

  admin_ssh_key {
    username   = "testadmin"
    public_key = file(var.ssh_public_key_path)
  }

  os_disk {
    caching              = "ReadWrite"
    storage_account_type = "Standard_LRS"
  }

  source_image_reference {
    publisher = "Canonical"
    offer     = "0001-com-ubuntu-server-jammy"
    sku       = "22_04-lts"
    version   = "latest"
  }

  tags = {
    environment = "staging"
  }
}
outputs.tf
output "public_ip_address" {
  description = "The public IP address of the VM"
  value       = azurerm_public_ip.main.ip_address
}

output "ssh_command" {
  description = "Ready-to-use SSH command"
  value       = "ssh -i ~/.ssh/id_rsa testadmin@${azurerm_public_ip.main.ip_address}"
}
Full Provisioning Flow
terraform init
  └─ Downloads azurerm provider v4.1.0
  └─ Connects to Azure Blob Storage backend

terraform plan
  └─ Reads current state from Blob Storage
  └─ Calls Azure Resource Manager API (read-only)
  └─ Computes diff: what to create / change / destroy

terraform apply
  └─ ARM authenticates via subscription + CLI credentials
  └─ Creates: Resource Group
  └─ Creates: Virtual Network  (depends on RG)
  └─ Creates: Subnet           (depends on VNet)
  └─ Creates: Public IP        (depends on RG — parallel with Subnet)
  └─ Creates: NIC              (depends on Subnet + Public IP)
  └─ Creates: Linux VM         (depends on NIC)
  └─ Writes updated state → Azure Blob Storage
Key Takeaways
- Terraform models Azure's dependency graph — resources are created in the correct order automatically based on references between them.
- The NIC is the network attachment point — it binds the subnet placement and the public IP into one object that the VM references.
- Public IP is an independent resource in Azure — it is associated to the NIC, not owned by it. This lets you detach and re-attach IPs without recreating the VM.
- Remote state in Blob Storage is not optional for teams — it provides locking, shared access, and a reliable source of truth for your infrastructure.
- Always add an NSG — a VM with a Public IP and no NSG is accessible from the entire internet on all ports.
Source Code
The full Terraform configuration for this deployment is available in the DevOps Portfolio repository.
terraform-azure-vm/
  main.tf        ← all resources defined above
  variables.tf   ← prefix and ssh_public_key_path
  outputs.tf     ← public_ip_address output
  backend.tf     ← Azure Blob Storage remote state